How to use smart capture - can
Smart Capture
Either you are a teacher, a course creator, an engineer or a professional in your work, probably you have created presentations, demonstrations or training materials sometimes. ActivePresenter can help you to create these materials easily and quickly with just a few clicks. For example, you want to make a tutorial that guides everyone the way to install an add-on for Firefox step by step. Let’s start capturing Firefox by using Smart Capture method, and then perform actions in Firefox as you normally do. When you are done, just stop capturing, a project with sequential slides that describe your actions (where you clicked, what you typed…) is created for you. Does it sound interesting? Let’s continue this tutorial to get familiar with Smart Capture in ActivePresenter.
What is Smart Capture?
Smart Capture is the most commonly used recording method in ActivePresenter. With Smart Capture method, screenshots are captured when there is an input from your mouse or keyboard. Each time you click a mouse or press a key, ActivePresenter captures a screenshot, and also generates necessary objects to illustrate your action. The screenshot as well as objects of each step are placed in one slide. The overall capture process produces a rich content demonstration or interactive simulation which contains sequential slides.

Captured Slides
When should I use Smart Capture?
Smart Capture should always be used except that you want to record the motion effects exactly (movement of the mouse, resizing of windows, video or animated content, etc…)
How to capture an application using Smart Capture method?
ActivePresenter can capture entire screen, a specific area on the screen or a running application window. In this tutorial, we pick capturing an application as an example. The procedures for others are almost the same.
To capture an application using Smart Capture method, do the following steps:
- Open the application you want to capture. And also determine the sequence of actions you’re going to demonstrate in that application.
- Open ActivePresenter.
- Click on the welcome screen, or select menu and click
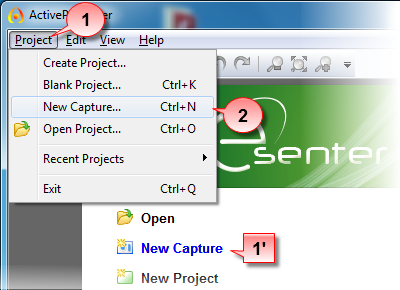
Select “New Capture”
- Type the project name, select profile, and then click OK button.
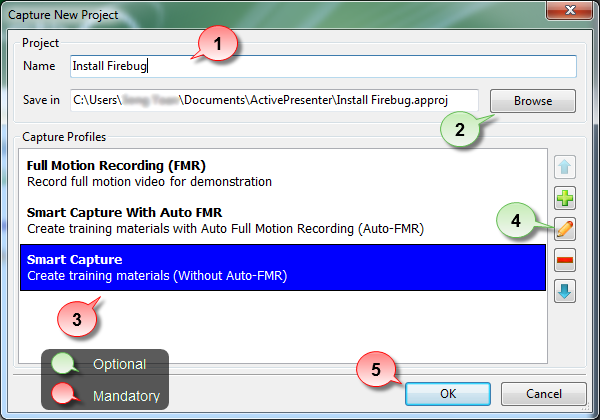
Create new project using Smart Capture method
Now you see that ActivePresenter main window disappears, and a dialog as well as a green rectangle is displayed.
- Select and in the applications list, select the application that you want to capture, Firefox for example.
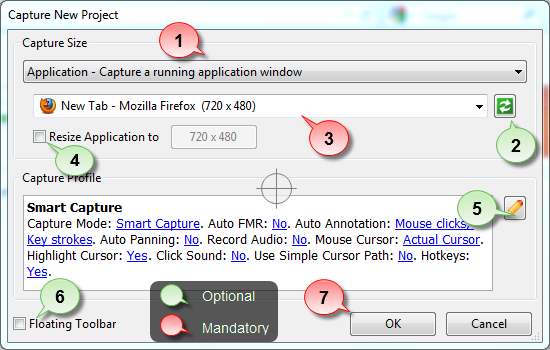
Select an application to capture
- Click OK and wait a moment for ActivePresenter to prepare everything needed.
- When the Preparing message disappears, ActivePresenter is ready to capture. Let’s perform the actions that you want to demonstrate in the captured application (Firefox in this case).
- When you are done, there are several ways for you to stop capture:
- Click ActivePresenter icon in the system tray, then click Stop.
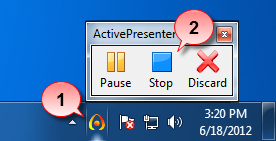
Stop Capture from system tray
- Press hot key if it is enabled, default is End key.
- Click Stop on Floating toolbar, if it is available and automatic panning is turned off.

Click Stop on Capture Floating Toolbar
- Click ActivePresenter icon in the system tray, then click Stop.
What are advantages of Smart Capture over Full Motion Recording (FMR)?
Using Smart Capture method has several advantages:
- Easy to create interactive and branching content.
ActivePresenter inserts interactive objects and annotation objects for you automatically in Smart Capture. This makes the content almost ready to publish for quick simulation. Trainers/learners can perform actions on the interactive presentation as if they are doing on the captured application. - Easy to manage and edit.
Project created using Smart Capture method is divided into sequential slides, each slide represents a step, so it is easy to manger and edit. - High quality but small file size output.
With this method, screenshots are captured when mouse, keyboard events occur, not constantly at fixed rate as in FMR, so the output size is usually smaller. - Possible to switch to FMR automatically or manually.
While recording using Smart Capture method, you can manually switch between this method and FMR using hot keys (defaults are F9 and F10). This is very useful when capturing operations such as mouse scroll, mouse drag-n-drop… You can also configure so that ActivePresenter switches to FMR automatically when you start doing these operations and switches back when the operations finish.
Hence, if you are looking for an easy-to-use, SMART and useful for your work, especially in screen recording, making tutorial or even high quality screencast as well as eLearning tool, then we suggest you start download our product and have a try. Check out Pricing here (We also offer Free Edition for Personal & Non-commercial users).
See more related articles about Tutorials.
How to use smart capture on galaxy S9 and galaxy S9 Plus
Last Updated on March 7, 2021 by Bestusefultips
Samsung galaxy S9 & galaxy S9 plus has several awesome features such as super slow motion camera, smart stay, video enhancer, Intelligent scan, palm swipe to capture and more. But in this tutorial, i’ll show you complete guide to enable and use smart capture on galaxy S9 and galaxy S9 plus Oreo devices.
You can enable smart capture in galaxy S9 and galaxy S9 plus using advanced features settings. This galaxy S9 & S9 plus smart capture feature is useful to capture hidden area of the screen and other activity on screenshot you taken. Follow below given step by step process to turn on and use smart capture on galaxy S9 and galaxy S9 Plus Oreo devices.
You Might Like This:
How to set up and use smart lock in android Oreo 8.0 & 8.1
How to turn on smart Wi-Fi switcher on OnePlus 5/5T
How to enable and use smart capture on galaxy S9 and galaxy S9 Plus Oreo
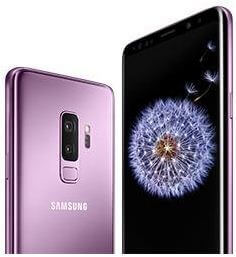
Step 1: Open settings in your galaxy S9 & S9 plus
Step 2: Tap on Advance features
Here you can see different settings such as Games, One handed mode, Finger sensor gestures, quick launch camera, multi window, smart capture, swipe to call or send message gesture, dual messenger and more.
Step 3: Turn on Smart capture toggle button
This smart capture feature helps to capture hidden areas of the screen, draw on the screenshot, crop the screenshot and share the screenshot with your friends or other contacts.
Step 4: Now press volume down & power button at same time to take screenshot on galaxy S9 & galaxy S9 plus devices
Step 5: You can see taken screenshot at bottom right side corner in your S9 & S9 plus
Now bottom of the screen, you can see Bixby vision, scroll capture, draw, crop and share button in your Samsung galaxy S9 and S9 plus.
You can also take screenshot on galaxy S9 and galaxy S9 plus using below gesture.
Palm swipe to capture Gesture:
Swiping the edge of your hand across the screen to take screenshot on galaxy S9 and galaxy S9 plus. You can’t use this galaxy S9 gesture while the on-screen keyboard is showing.
And that’s it. We hope this makes it clear how to enable and use smart capture on galaxy S9 and galaxy S9 plus Oreo. Have any questions? Leave them in below comment section. Don’t forget to check out our other galaxy S9 and S9 plus articles.
Smart Capture Manual
1. Description
Smart Capture is a program for creating MSI packages by creating a capture of non-MSI application
installations.
The purpose of the program is to easily and quickly go through the process of setting up the environment,
creating the captures, installing the target software, and generating the output project.
1.1. Features
- Capture any executable installer to an MSI package.
- Capture directly from the local machine, a VirtualBox virtual machine, or from a remote PC.
- Save virtual machine snapshots from one session to the next to cut scanning time in half.
- Automatically retrieve list of exclusions from the Smart Package Studio servers in order to minimize
time spent on managing what captured items the output project should contain.
2. Installation
2.1. Prerequisites
Smart Package Tester requires the following applications installed on the target PC:
- Microsoft .NET Framework 4.6.2
- Oracle VirtualBox 5.2. or newer is required for the virtual machine capture support.
2.2. Installation
Run the installation MSI for the appropriate version of your operating system (x86 or x64).
3. Usage
3.1. Choosing the capture source
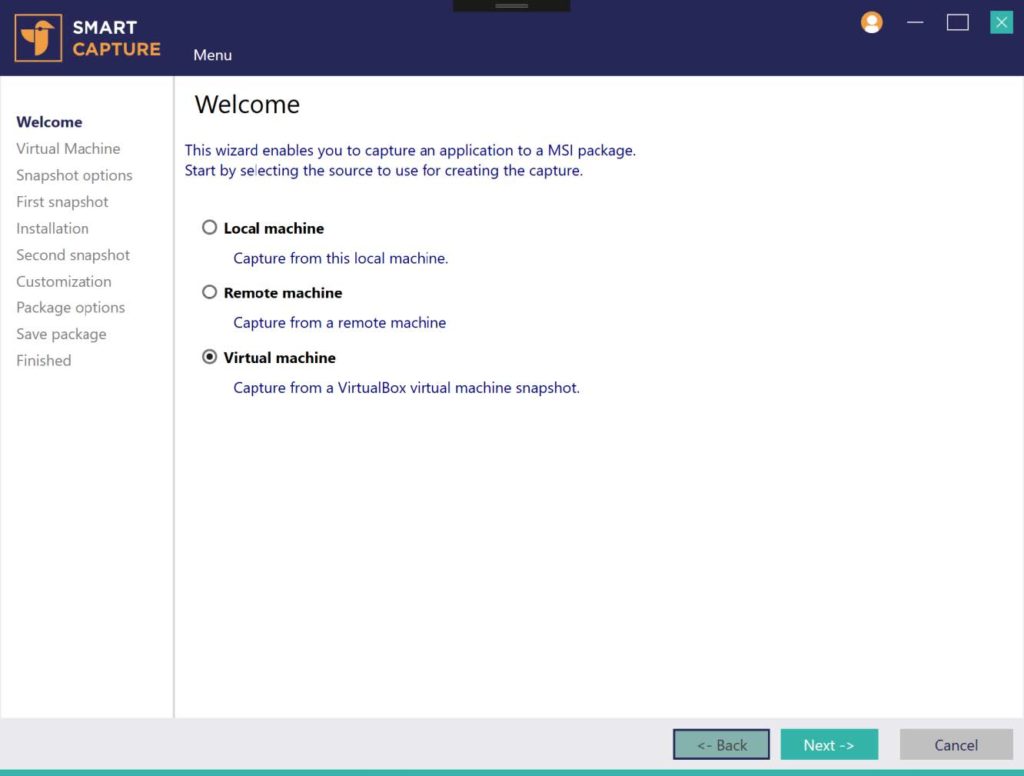
Smart Capture currently supports three sources for creating a capture:
- Local machine: Create a capture from the local machine that the program is running on. This usually
entails installing Smart Capture on a virtual machine and running it there. - Remote machine: Create a capture over the network from a remote machine. See step 3.2.
- Virtual machine: Create a capture from a VirtualBox virtual machine. See step 3.3
3.2. Configuring remote machine source
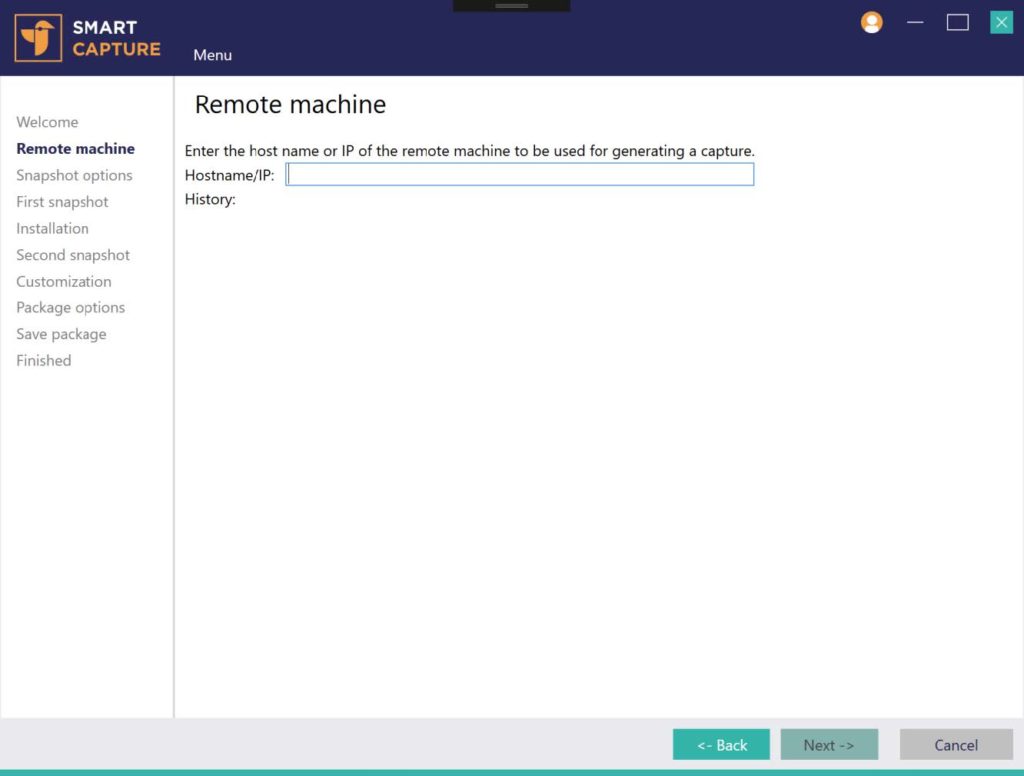
The remote machine source must be configured with the IP or the host name of the remote machine to connect
to. After pressing next, a dialog may appear if the current user does not have administrative rights on the
remote machine.
3.3. Configuring virtual machine source
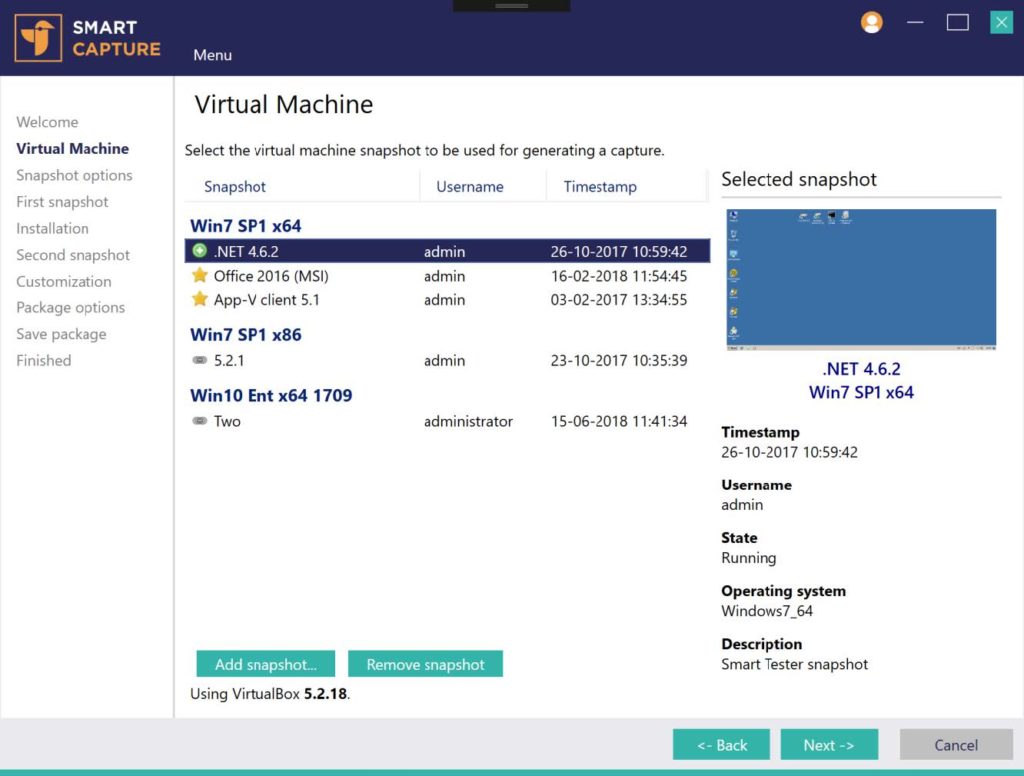
The virtual machine view enables choosing what virtual machine snapshot to use for the capture.
The snapshots available must be added to the program before they can be used. The snapshots added are shared
between Smart Capture and Smart Tester; any snapshot added in either program will be available in the other.
To add a snapshot, press the Add snapshot button.
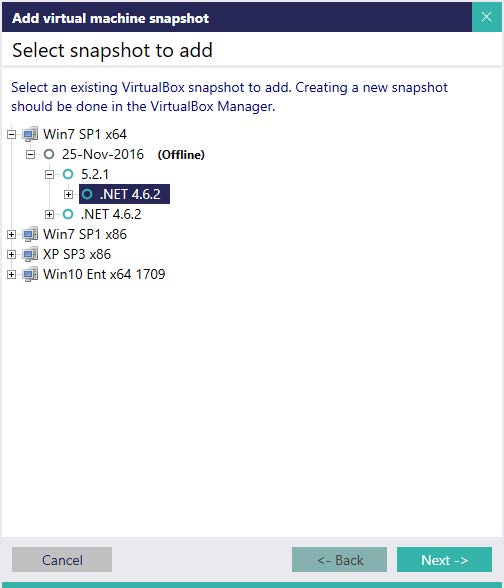
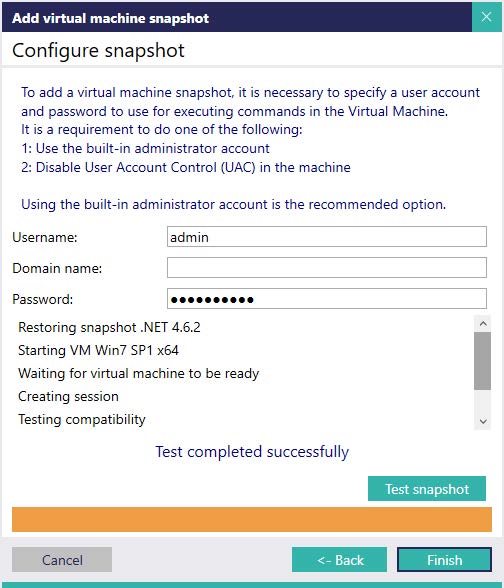
Figure 1 – Select snapshot to add: Displays a tree of all VirtualBox virtual machines and their
snapshots.
Select which snapshot to add and press Next.
Figure 2 – Configure snapshot: Enter the login information to be used for the snapshot.
After entering the information, Test snapshot runs a range of tests to ensure that the selected snapshot is
configured correctly for use with the program.
Press Finish to close the dialog and add the snapshot to the program.
3.4. Setting capture options
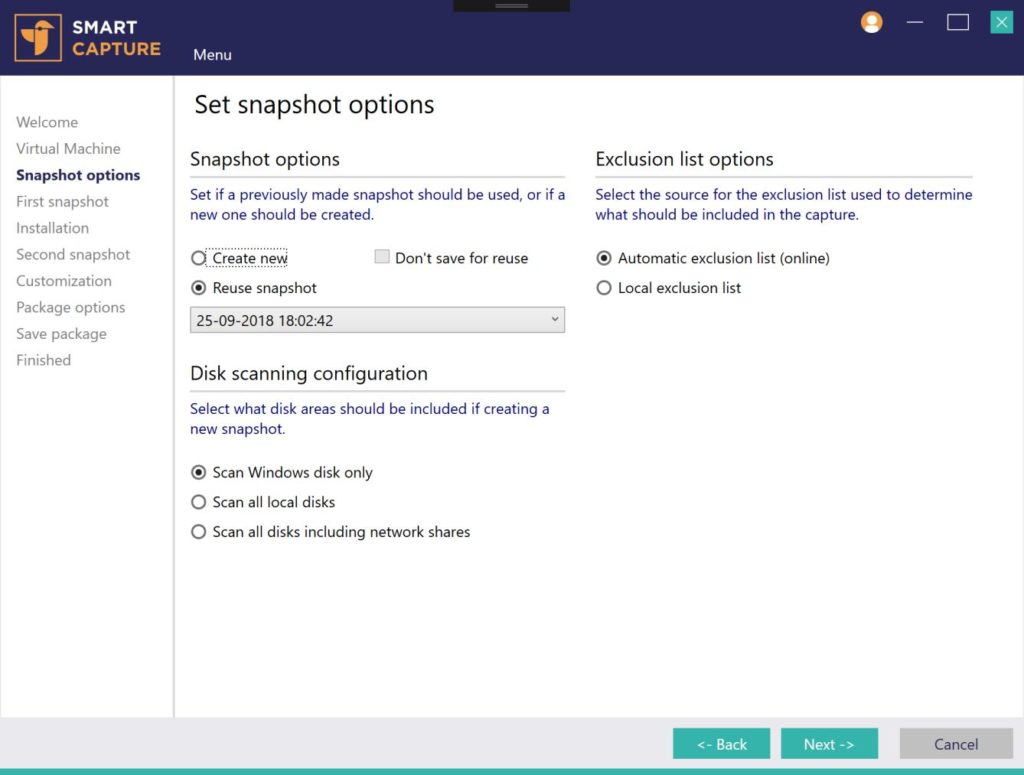
Options for how to create the snapshot can be set in this view. Any settings set here affect both the first
and the second snapshot taken.
Snapshot options:
- Create new: Creates a new snapshot, instead of reusing an existing one.
- Don’t save for reuse: Do not save the new snapshot for subsequent runs of the program.
- Reuse snapshot: Use an existing snapshot rather than create a new one.
Disk scanning configuration:
Select what areas of the target machine should be scanned while creating the capture.
Exclusion list options:
Select if the automatic online exclusion list should be used. It is highly recommended to leave this option
enabled, as the machine learning algorithms of the Smart Package Studio server helps by dynamically
customizing the exclusion lists and depends on knowledge gained by all of our users.
3.5. Running the target installation
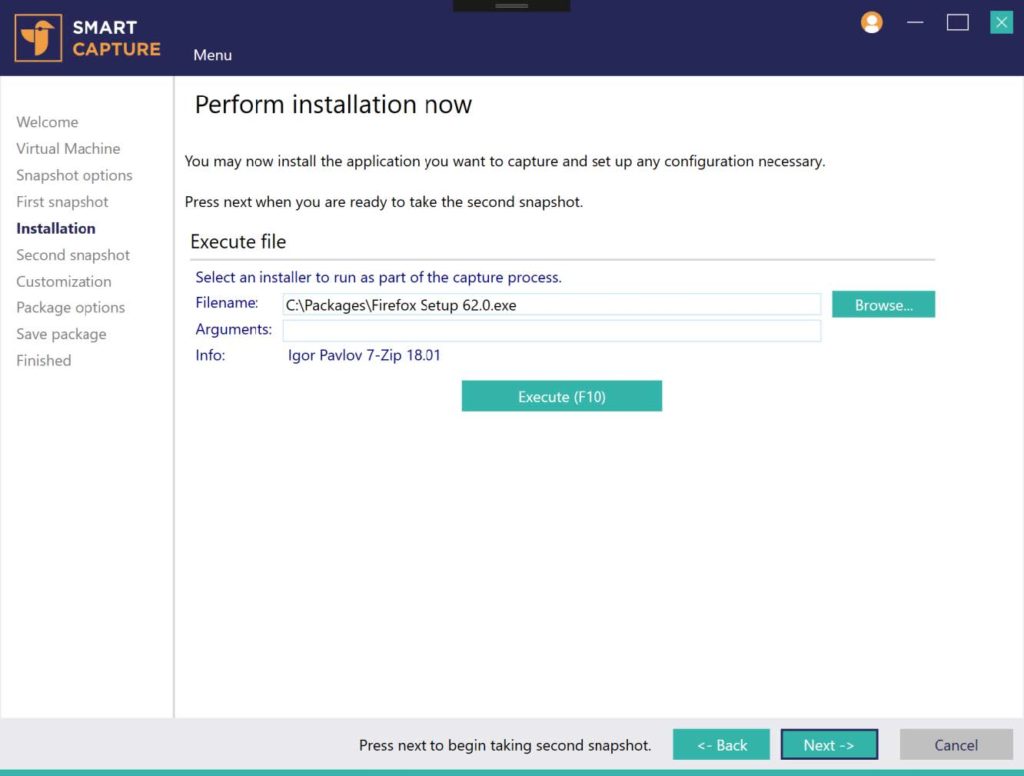
Once the initial snapshot has been created, the target installation for the capture can be executed.
Use the Browse button or drag any supported file type into the window to prepare it for execution. Set any
arguments for the installer, and press the Execute button to run the installer.
Note: A message will appear if the installer returns any non-zero return code. This does not necessarily
mean that the installation failed, since different installers may use return codes to signify various
installation results rather than errors. Check the documentation of the target installation if you are
unsure if the installation resulted in an error state.
Once the installation has completed, you can perform any actions in the machine that should also be captured
in the resulting project package.
This may include:
- Installing additional software.
- Copying files or importing registry values.
- Opening the installed application(s) and setting preferences.
Reboots may be performed if capturing from a remote or from a virtual machine.
Once all related actions have been performed, press Next to create the second snapshot.
3.6. Managing capture exclusions and inclusions
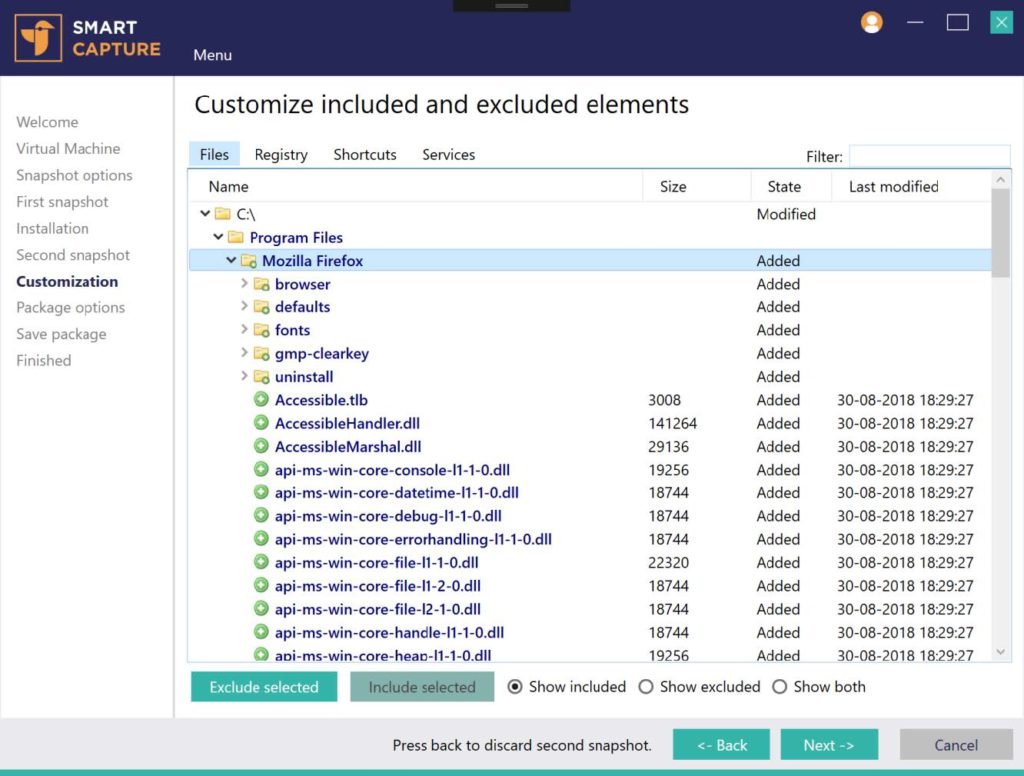
Once the second snapshot has been taken it is possible to choose what items captured should be included in
the resulting project. Items can be manually excluded or included from this view.
The Show included, Show excluded, and Show both radio buttons are used to choose what items
are currently visible.
The Files, Registry, Shortcut and Services tabs contain the various types of items captured.
Tabs that do not contain any items will not be visible.
The Filter can be used to only show items that match a specified string.
3.7. Setting package options
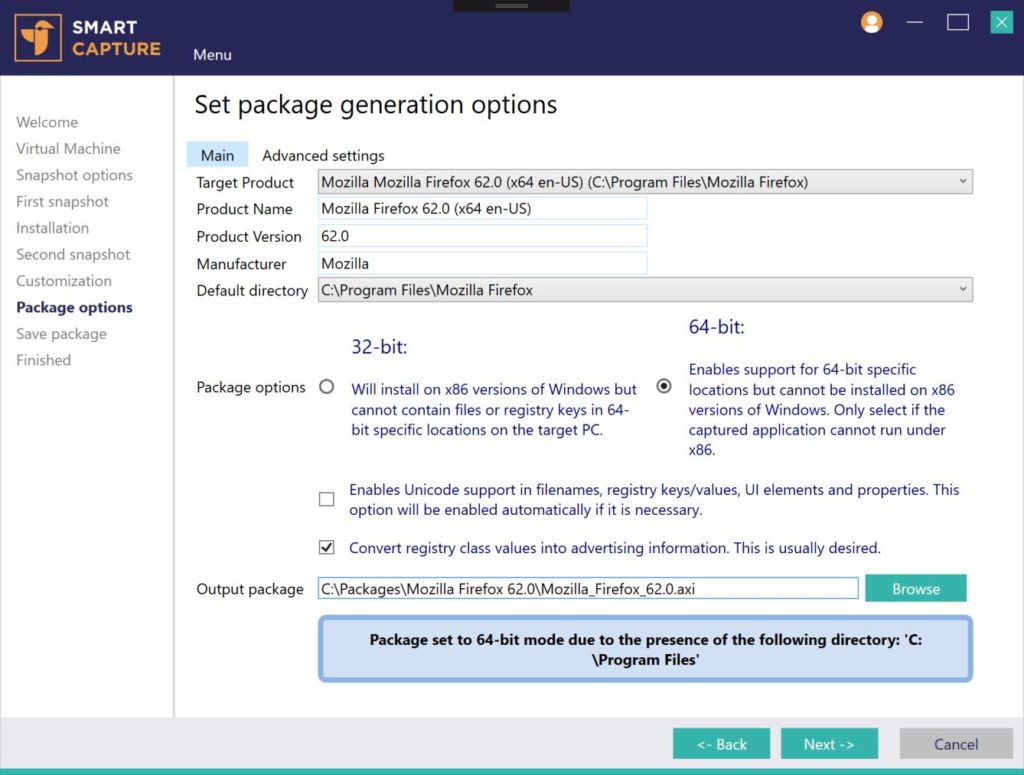
This view enables setting options for the project package to generate:
- Target product: If more than one installation was detected in the capture, this enables selecting
which one contains the main target application. This sets the other properties (Product Name,
Version etc.). - Product Name: Specifies the name of the generated project.
- Product Version: Specifies the version of the generated project.
- Manufacturer: Specifies the manufacturer used for the generated project.
- Default directory: Specifies the directory to set as INSTALLDIR.
- Package options: Contains major settings for the generated project.
- Output package: Specifies the file name of the generated project package.
Notices and/or warnings are displayed at the bottom.
The Advanced settings tab contains detailed settings for each step of the project generation process.
These do not generally need to be modified.
Pressing Next will start the process of generating the project package.
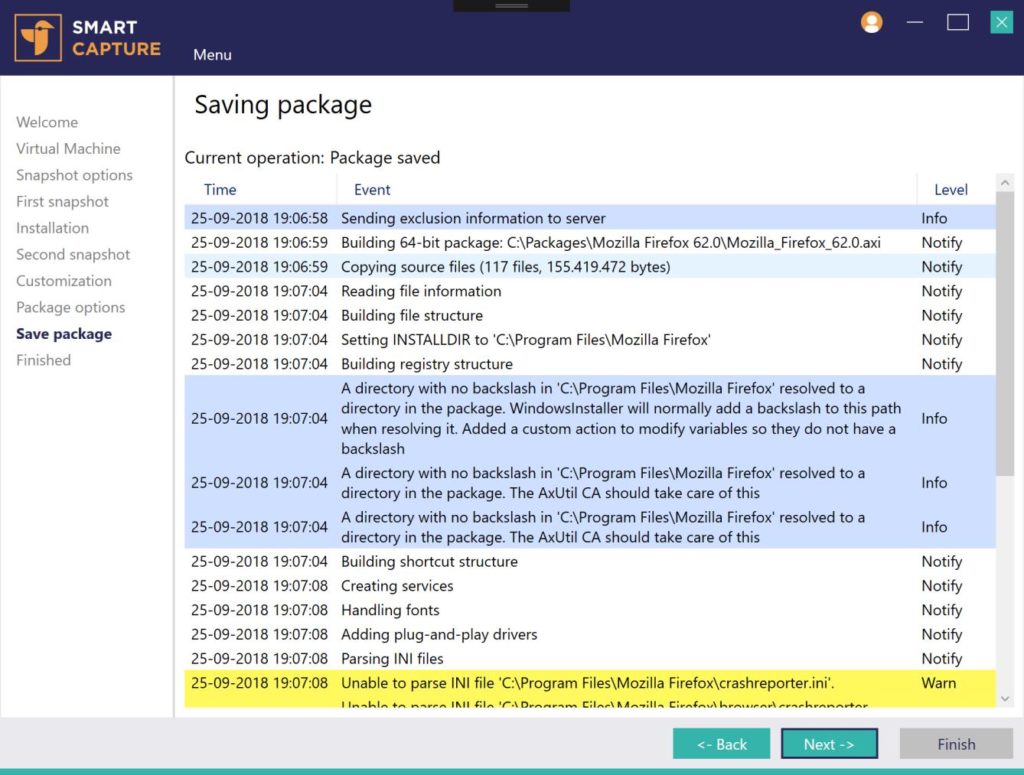
The Saving package view will display the progress and any notices, warnings or errors encountered
during the project generation process.
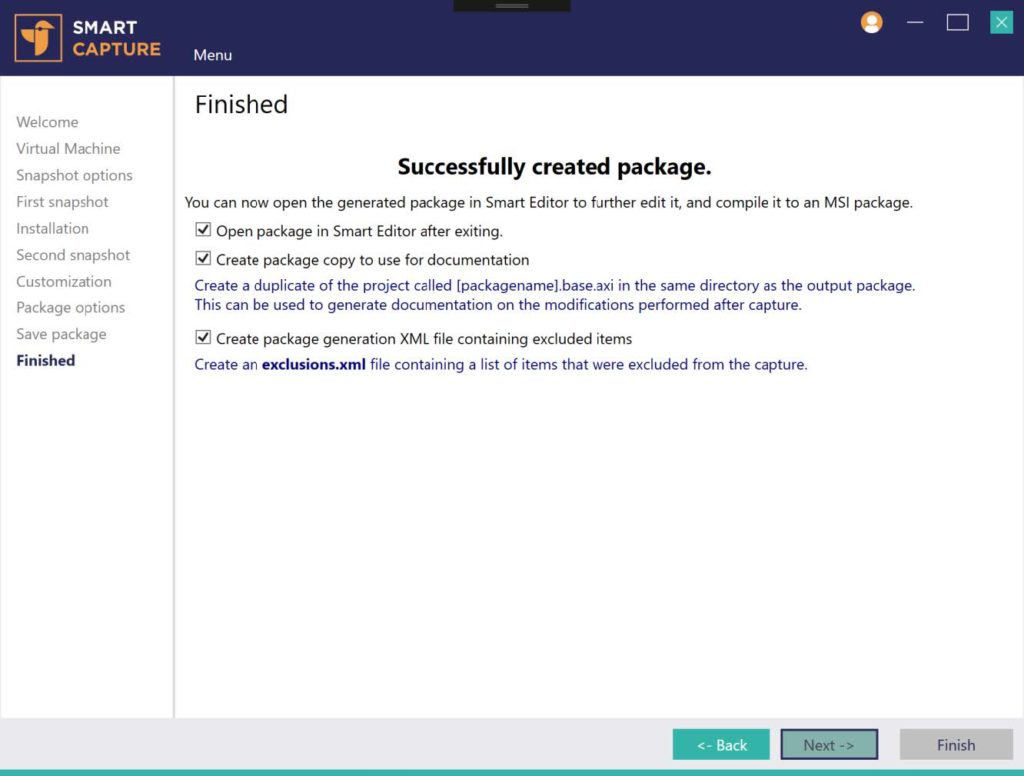
The Finished view displays the end state of the package generation process and options to perform at
the end of the procedure.
- Open package in Smart Editor after exiting: When closing Smart Capture, will open the newly
generated project package in Smart Editor. - Create package copy to use for documentation: Creates a copy of the project file to use for a
comparison to create documentation on what items have been changed in the project file. - Create package generation XML file containing excluded items: Creates an XML file in the same
directory as the project containing information on what items were excluded from the capture.
How can we help?
How to Set Up and Use Smart Capture
The success of every business starts with knowing who your customers are and relies on your ability to deliver them the best experiences possible. And with a channel such as SMS, where personalization is taken to a whole new level, it is now easier than ever to deliver ultra-targeted customer experiences.
This tutorial will show you how to set up and use Smart Capture to create dedicated lists with new and existing subscribers and leverage those to boost engagement and nurture loyalty.
What is Smart Capture
Smart Capture provides merchants with new ways to learn subscribers' intent in real-time. It allows new and existing subscribers to opt-in more than once and stay in the know about your offers. From seasonal deals, back-in-stock items, and early access through new product launches and giveaways, all the way to partner collaborations, company events, and more.
Each time a customer signs up, they will be added to a list of your choice so you can easily target them later on with marketing campaigns specific to their interests.
Use Smart Capture to:
- Maximize your collection strategy by giving customers unlimited opportunities to sign up on different occasions and better understand what types of messages they want to receive from you.
- Acquire zero-party data on customer preferences in addition to phone and email and leverage this data to create personalized experiences on multiple channels.
How to Set Up Smart Capture
Setting up a personalized SMS Welcome Flow for both new and existing subscribers can be done with a few simple steps.
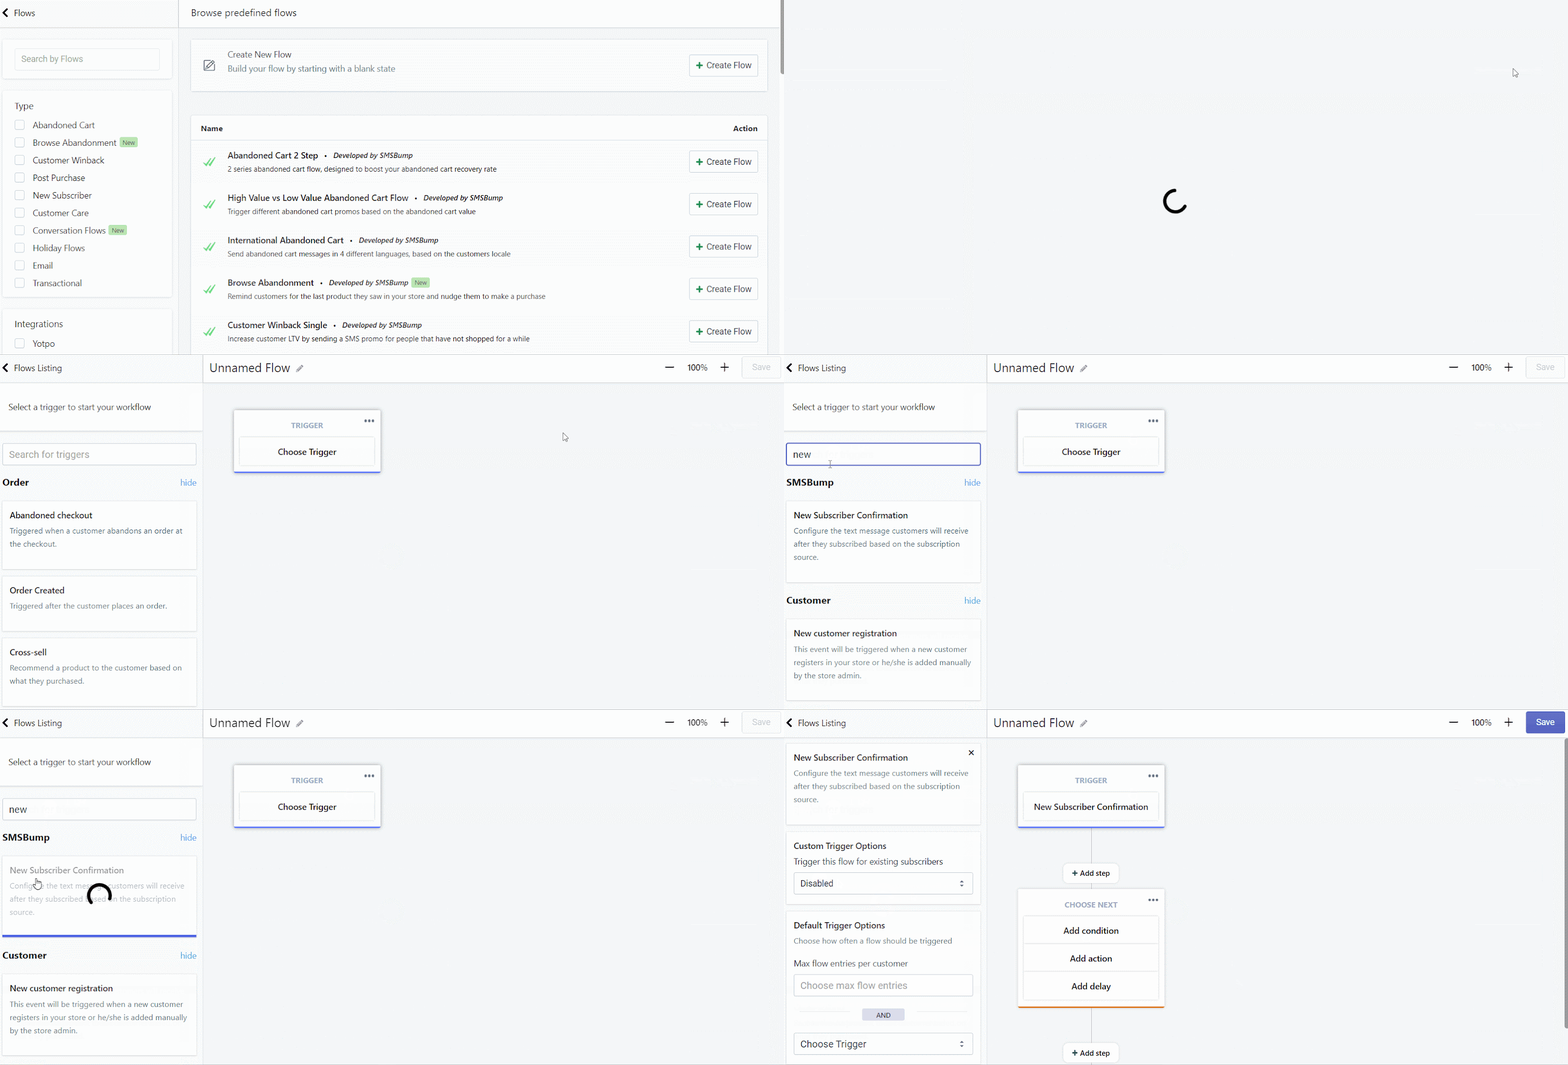
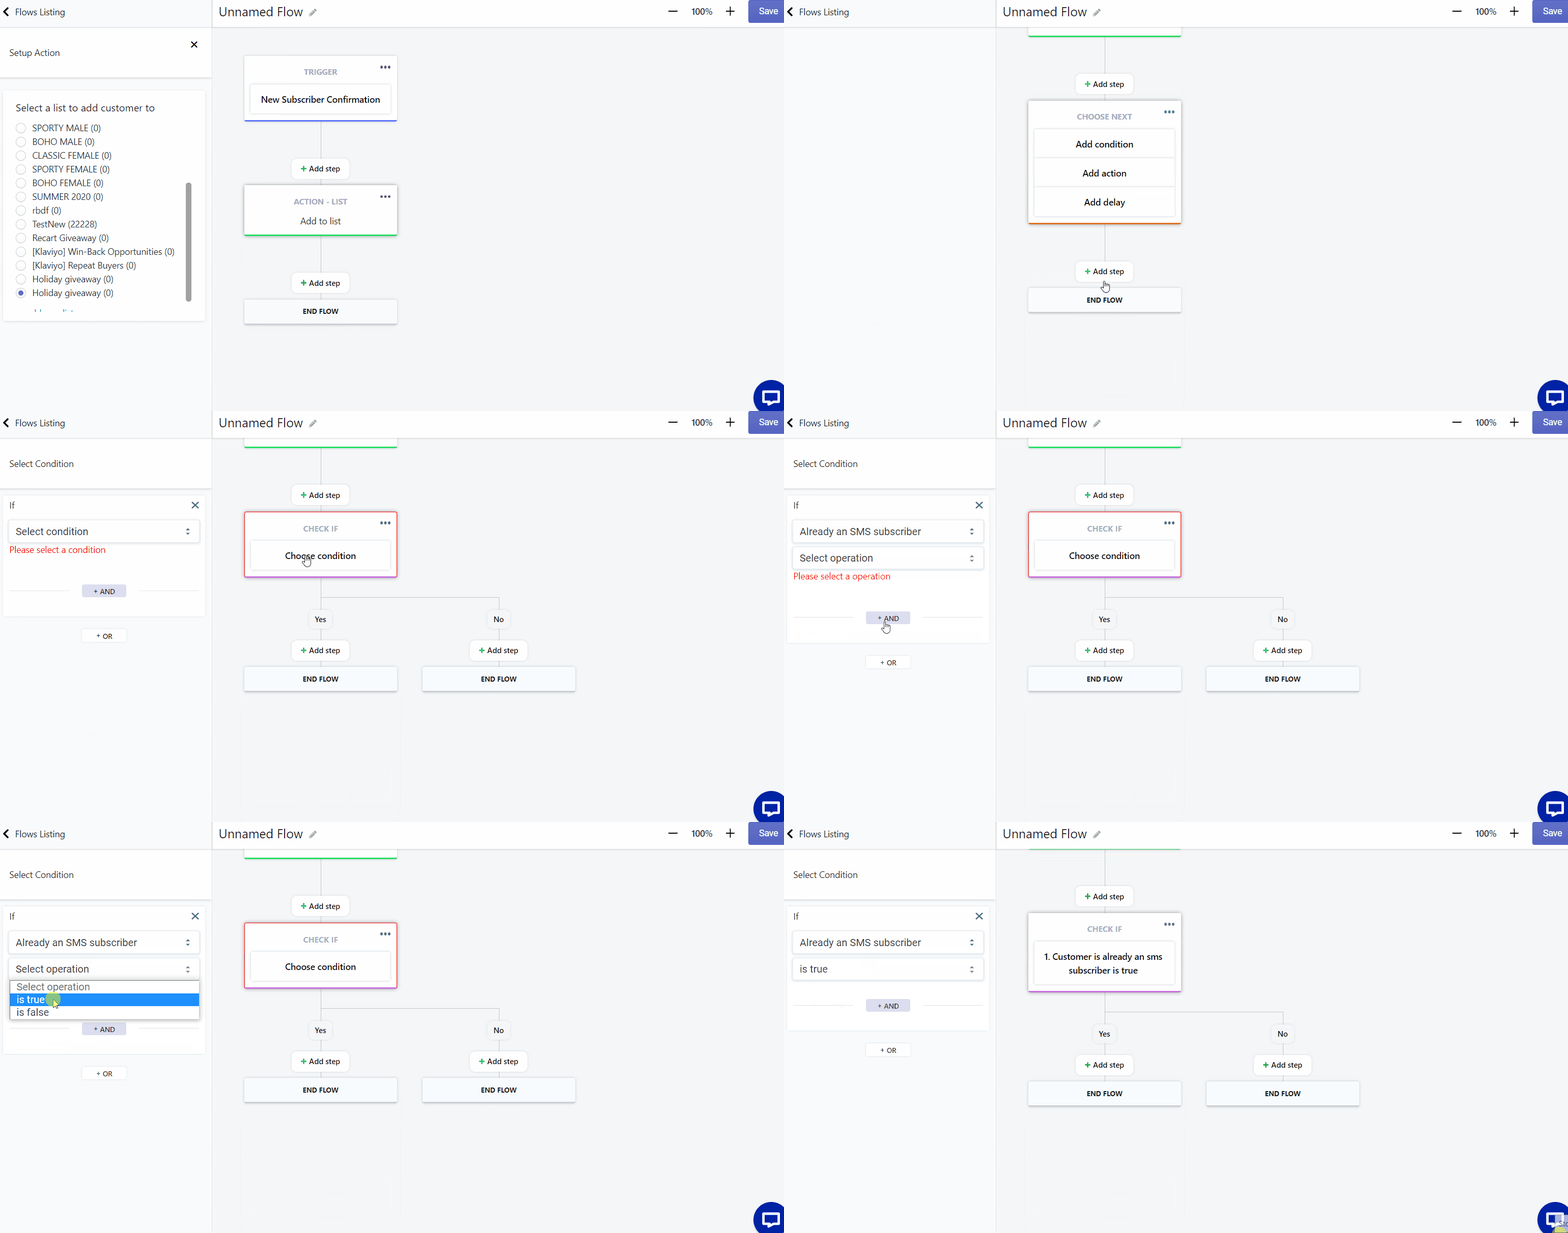
Step 1: Create a new flow and choose “New Subscriber Confirmation” as a trigger.
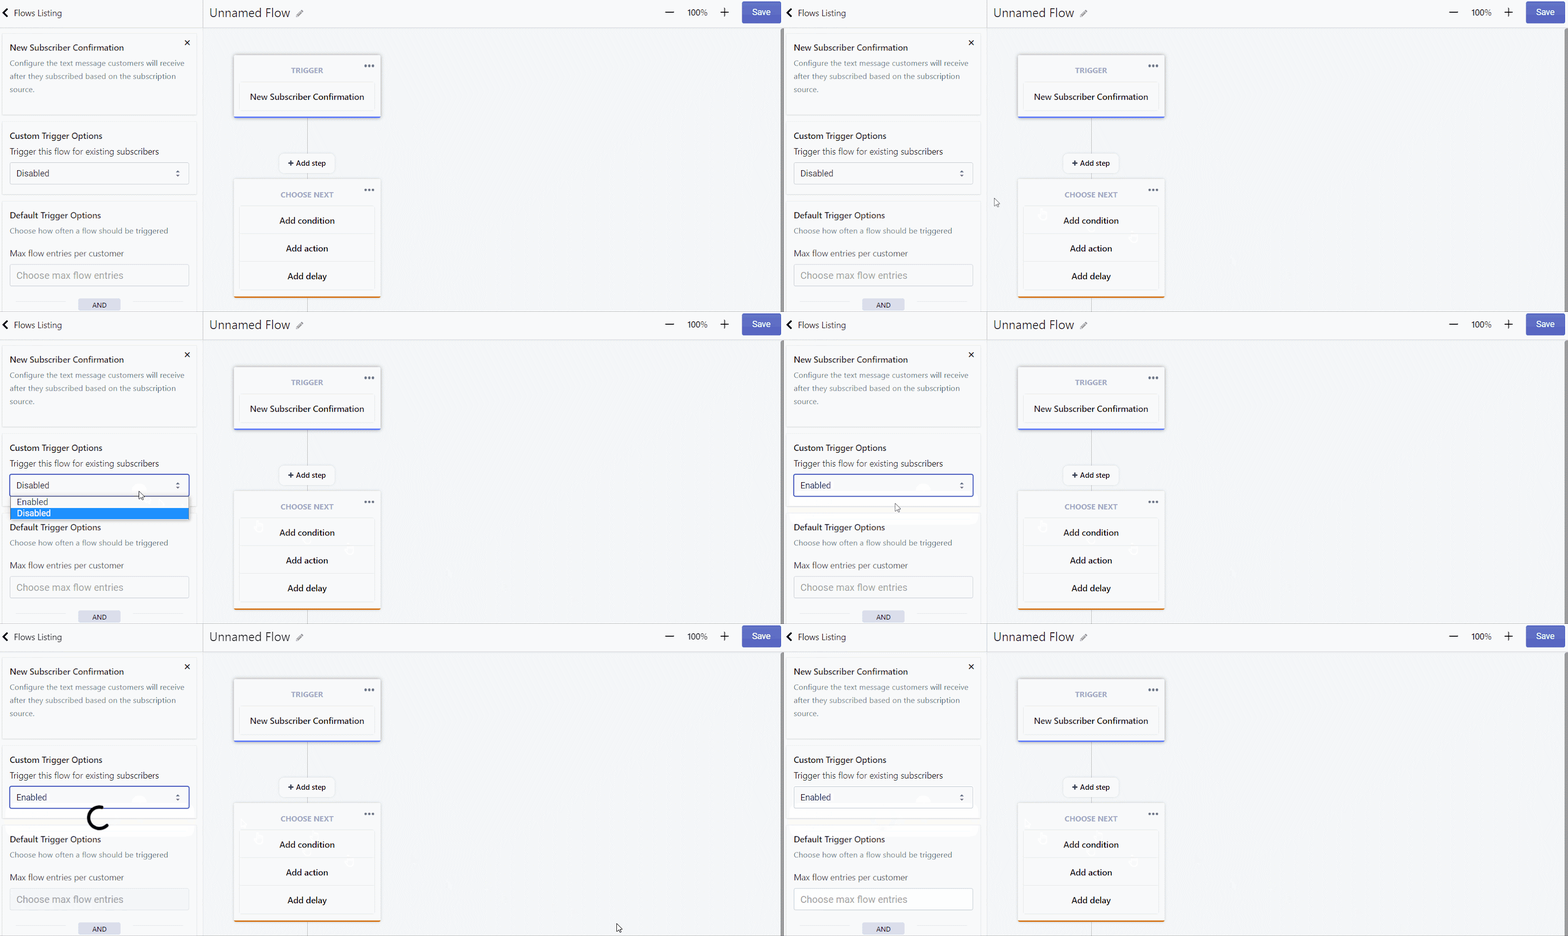
Step 2: Enable the Custom Trigger Options to trigger this flow for existing subscribers as well.
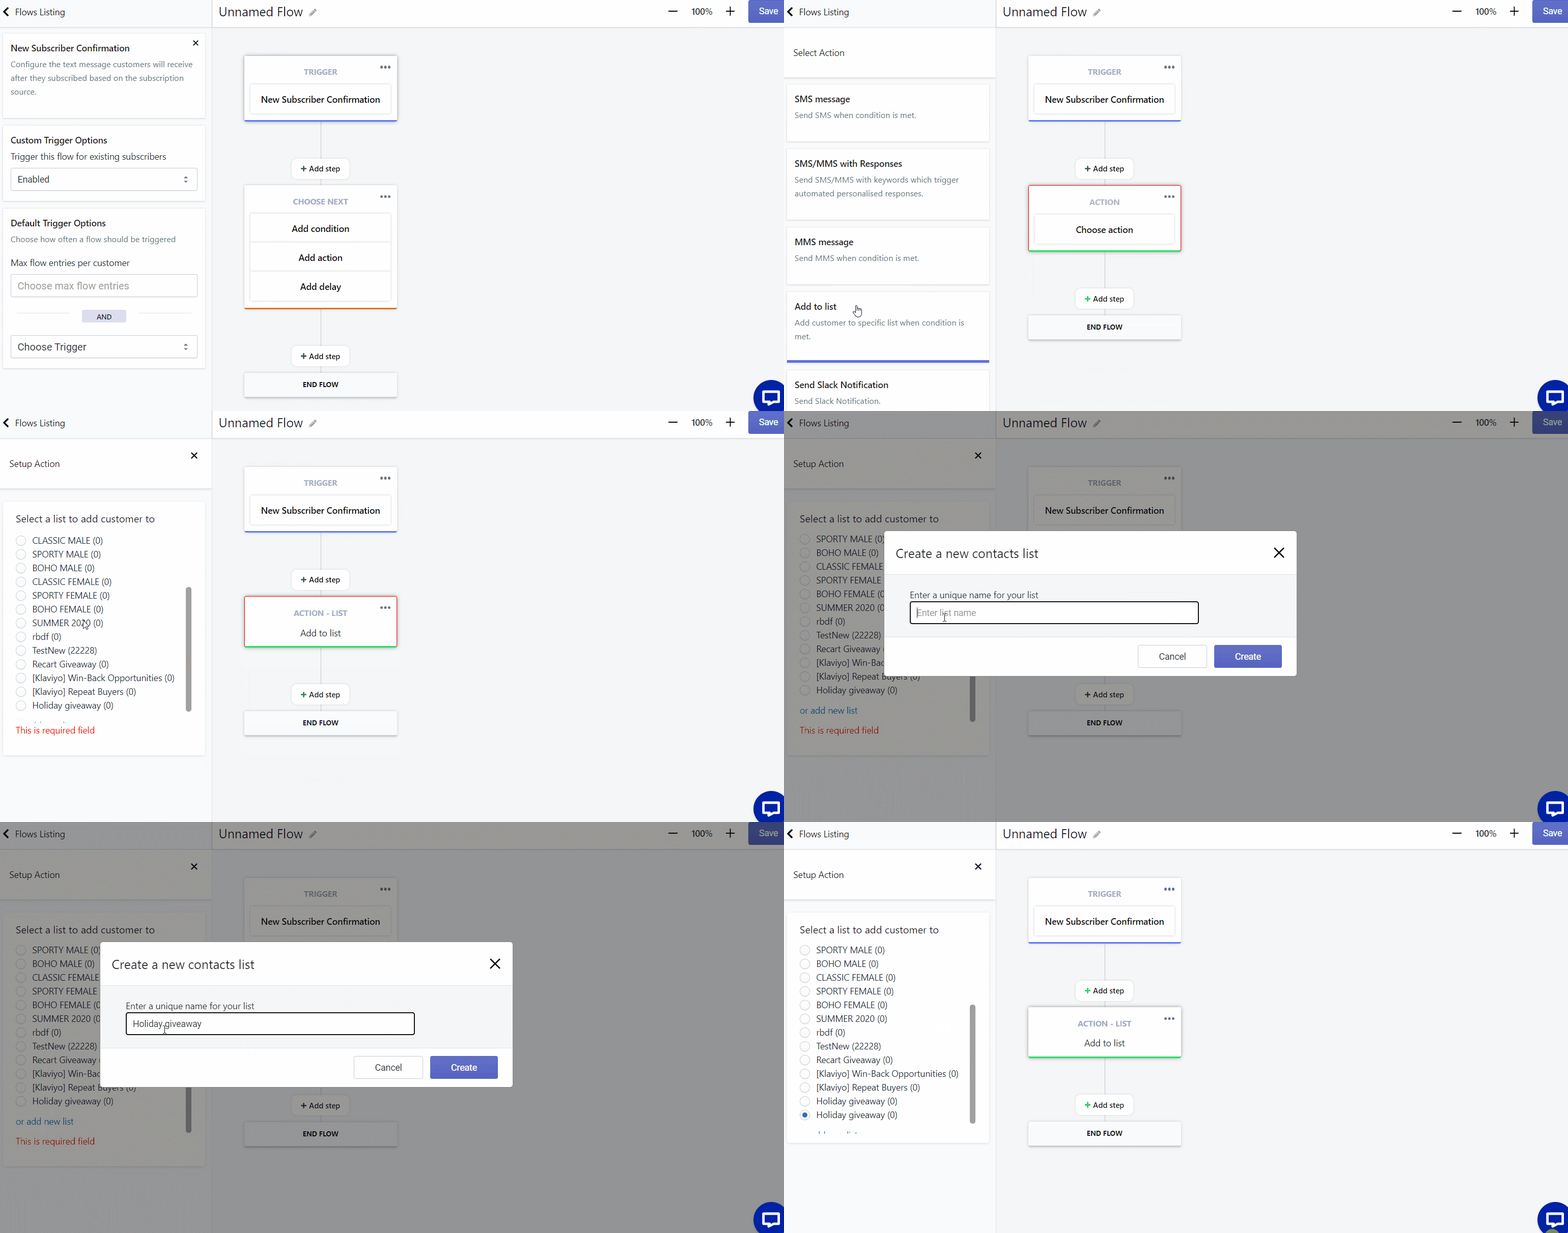
Step 3: Add action “Add to list” and give a name to that list. You can use it later on to target these subscribers with specific campaigns.
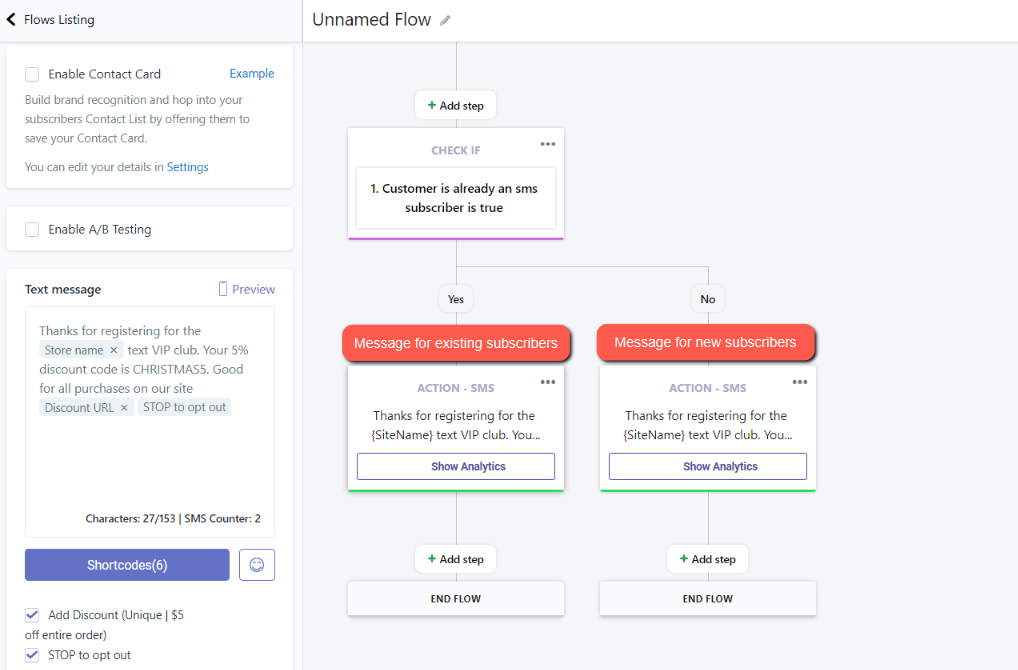
Step 4: Add a condition “Already an existing subscriber” and mark “is true.”
Step 5: Set up the text messages that will be sent out to new and existing subscribers.
You can use this tutorial to create a new subscriber collection tool or update an existing one.
Bonus tip: Don’t forget to customize the copy of your pop-up so that customers are fully aware of what to expect when they opt in, i.e., “Sign up to our SMS club to enter an exclusive $200 gift card giveaway”.
Subscriber Collection Analytics
You can now track the numbers of new and returning subscribers signing up for text marketing through each of your subscriber collection tools. Go to the Analytics page of this specific tool and hover over the Subscribers and Subscribers Growth metrics to see a detailed breakdown.

If you have any questions, please feel free to contact us or book a demo!
Related articles
Do you process lots of similar records, like invoices or contracts? You probably find scanning and inputting indexing information (aka metadata) manually, for each file, gets old fast. Not even your most dedicated administrative employee wants to spend large portions of their day doing data entry. After all, isn’t the whole point of getting a document management software to automate tasks to save time?
If you’re still manually scanning, tagging, and filing documents, consider this a friendly reminder that there is a better way! It's called Smart Capture. And it's included with all versions of DocuXplorer.
Smart Capture is DocuXplorer’s answer to automating data entry. You won’t ever have to spend exorbitant amounts of time manually indexing documents again. It is an essential part of your DX toolkit that every DX user should be using.
If you’re not using this feature regularly or you’re unsure of when to use it, don’t worry. By the end of this article, you will know the Smart Capture basics and be well on your way to processing and managing your forms in record time.
What is Optical Character Recognition (OCR)?
Most DocuXplorer users are likely familiar with Optical Character Recognition (OCR), which allows the software to turn scanned images of text into machine-readable text. Before the proliferation of OCR technology, users who wanted to digitize paper documents had to manually re-type the text in its entirety. OCR is a core feature of DX that allows users to scan documents and have them automatically digitized, allowing users to search the entire body of a document.
How is Zonal OCR different from regular OCR?
The most significant difference between OCR and Zonal OCR is that OCR digitizes all the text in a document, while Zonal OCR digitizes text within specific areas of a document. If you have an invoice and the bill to company is always in the same place on the page, and the date is always in the same place on the page, you can OCR just those specific areas where the information changes, rather than every word on the page.
What is Smart Capture?
DX Smart Capture takes it a step further, taking the text from these “zones,” mapping it to your predefined index set fields and saving the file in the corresponding cabinet, drawer, and folder. It’s like having a data entry auto filing assistant! This will save you so much time!
Using Smart Capture
So, when would you use Smart Capture?
Let’s say you had a stack of hundreds of invoices. After a busy day at work, you could spend a few hours manually inputting all the information, or you could set up a template using Smart Capture and let DX do it for you. Whether working with a physical or digital file, DX extracts the data in the pre-defined zones, maps it to the appropriate index set fields, and files the record away effortlessly.
Areas that vary, like the Invoice Number and Customer Name, are identified as specific zones that Smart Capture will map to the corresponding index set fields. You can do a batch scan of the documents, and DX will automatically assign them to the appropriate cabinets, drawers, and folders.
Use this process for each of your template documents so that your team spends less time scanning and entering metadata and more time doing the work that really matters.
The Benefits of Using Smart Capture
DocuXplorer is all about making your life easier by providing convenient, productivity-boosting document management solutions that are easy to implement and use. Smart Capture is one of the essential features that every user should be taking advantage of. The benefits of using Smart Capture include:
Improved Efficiency
You can digitize and tag your documents with metadata as quickly as you can batch scan them. This saves users countless hours by eliminating the need to do this manually. The only reason not to use Smart Capture is if you enjoy wasting time on repetitive tasks when you could spend your time being more productive. Smart Capture allows you to maximize the efficiency gains you get from DX.
Increased Productivity
When you’re not spending time tagging your scanned files, you can spend more time getting other critical tasks done. Salespeople can spend more time converting leads and less time processing customer invoices. Executive assistants can spend more time writing correspondence or assisting with operational tasks and less time standing behind a scanner. When you let our technology work for you, it allows you to do your best work.
No More Human Error
By eliminating the need for manual data entry, Smart Capture minimizes human errors. Errors like typos, misspellings, and incorrect tags will be a thing of the past. Smart Capture handles all of this for you through automated processes.
Searchability
DocuXplorer’s OCR capabilities allow you to perform keyword searches for any word in a document. Once you’ve indexed the document, you can perform extremely pinpointed and accurate searches like: “I would like to see all invoices over $1000, from last month.” Or “I would like to see all applications with the status Needs Attention, with the owner Mary.” Or “show all receipts created more than 7 years ago.
Automation
Once Smart Capture automatically indexes and files your documents, you can trigger even more time saving processes. Check out the workflow library to set up reminders, approval processes, digital signatures, or run reports. Documents are always in motion, DX keeps them moving.
Smart Capture in Action
See how our clients put Smart Capture to work for them:
PARTS AUTHORITY
Parts Authority uses OCR and barcodes to scan signed copies of invoices as proof of delivery. They process tens of thousands of invoices each day. Automating this process with Smart Capture has saved them countless hours and resources.
“Without Smart Capture, it would be almost impossible to scan and file all of our invoices manually. DocuXplorer’s OCR features minimize our manual steps and maximize our efficiency.”
- Roger Bauby, Parts Authority
KERNELS POPCORN LIMITED
Kernels Popcorn Limited uses Smart Capture templates for all accounting-related documents. DX has transformed the way they process invoices and payables, saving them lots of time and energy.
“DocuXplorer’s Smart Capture feature saves us 70% of the time it would normally take to index our invoices and file them. It is a huge productivity boost.”
- Penny Daniels, CFO, Kernels Popcorn Limited
How it works
Identify a document you add to DocuXplorer time and again, like an invoice, bill, contract, or form. Create a template for this document using the steps below and map the areas of the document to the appropriate index set information and identify the cabinet, drawer, and folder it should reside in. Once the template is complete, end users just need to run the template when importing paper or digital files.
A Step-By-Step Guide to Smart Capture
If you’re not sure how to use Smart Capture, no worries. As with most DX features, it is straightforward and intuitively designed so that even non-technical users can take advantage of it. To learn how to use Smart Capture, check out the video and written instructions below:
To Create a New Template
- Click on the “Create OCR Smart Template” Icon
- Select the highlighted area to create a zone for.
- Right-click to assign a specific index set field indicating what the highlighted area contains (i.e. client name, invoice number, etc.)
To Use an Existing Template:
- Right-click onto a document
- Scroll down to “Capture Index Information Via” and select the appropriate template.
- DocuXplorer will index and file the document within the DX hierarchy.
Start Saving Time Today
Smart Capture saves our clients thousands of hours of manual labor and resources. Quickly setting up your Smart Capture templates pays dividends in the long run. You should be using this feature whenever possible.
Got Questions?
If you’re building a Smart Capture template yourself or would like to have us build one for you, you can always get help at support@docuxplorer.com.
Get In Touch

Warning: Undefined variable $z_bot in /home/bilincom/public_html/down/networking/how-to-use-smart-capture.php on line 175
Warning: Undefined variable $z_empty in /home/bilincom/public_html/down/networking/how-to-use-smart-capture.php on line 175
-
-
-